Stores
Managing stores, trading hours, and store pages
Add and update your stores, set trading hours and holiday hours, and publish a store page on your Shopify site.
Every physical location you run is a store in Shoppy Connect. A store holds everything customers need to find and visit you: its address, contact details, photos, and opening hours. Once a store is set up, Shoppy Connect shares those details with the channels you use, such as Google, your Shopify store locator, and a dedicated store page on your Shopify site.
This guide covers three things that work together:
- Managing your stores: adding, importing, and editing stores.
- Trading hours and special dates: regular opening hours and holiday hours.
- Shopify store pages: a page on your Shopify site for each store.
Managing your stores
The Stores list
Go to Stores in the sidebar to see every store in your organisation.
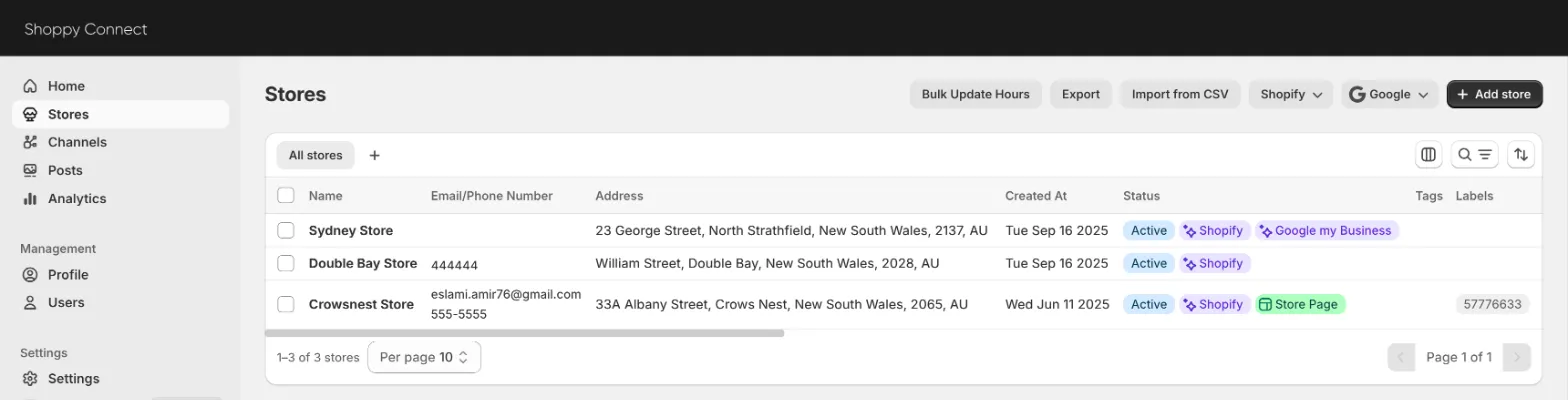
Each row shows the store’s contact details, address, and creation date. The Status column shows whether the store is Active, plus the channels it is published to, for example Shopify, Google my Business, or Store Page.
From this page you can:
- Search, filter, and sort stores with the icons on the right of the table.
- Save a view with the + next to All stores, so you can come back to the same filtered list later.
- Select several stores with the checkboxes to work on them together.
- Open a store by clicking its name.
The buttons at the top of the page let you add stores in different ways, which are covered below.
Add a single store
- On the Stores page, click Add store.
- Fill in the store’s details (see What you can set on a store).
- Click Create.
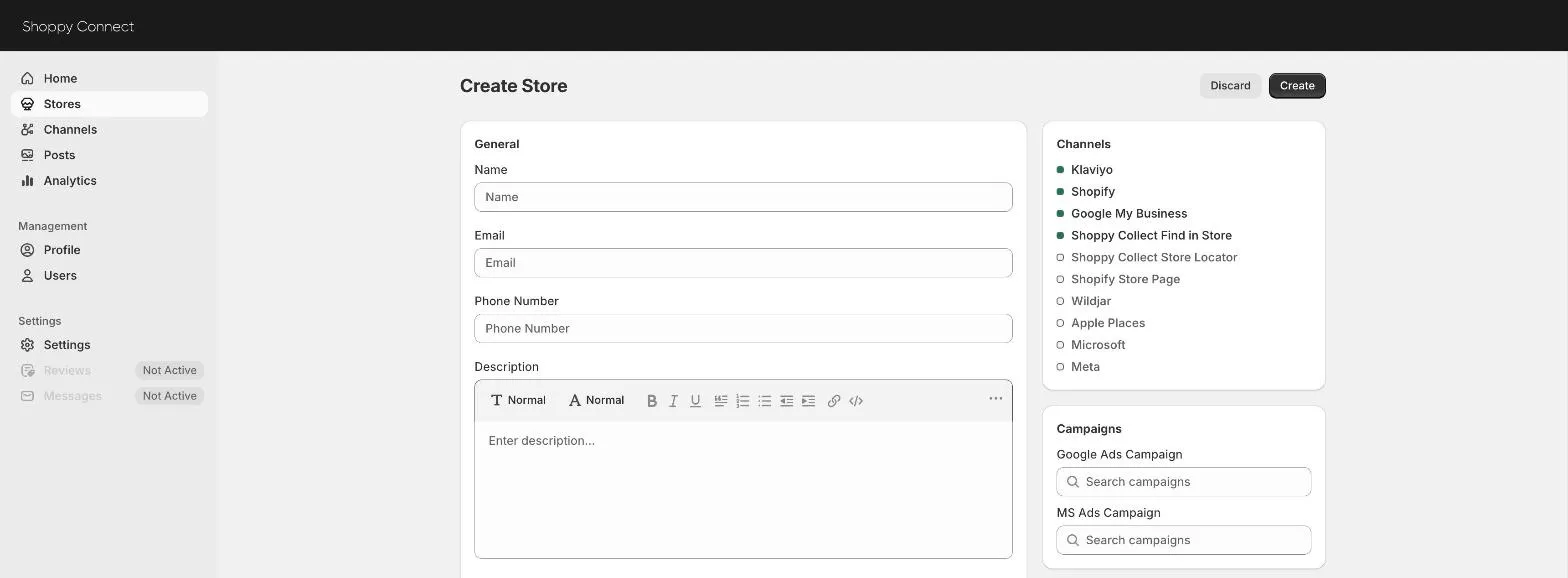
The Channels card on the right shows which channels the new store will be published to. Channels connected for your organisation are marked with a filled dot.
You can also start a new store from anywhere in the dashboard: click the + button in the top bar and choose Create New Store.
Import stores from a spreadsheet
If you have many stores, importing them is faster than adding them one by one.
- On the Stores page, click Import from CSV.
- Click Download CSV Template to get a file with the right columns. On a smaller screen, this button is under More actions.
- Fill in one row per store and save the file as CSV.
- Click Add file, choose your file, then click Upload.
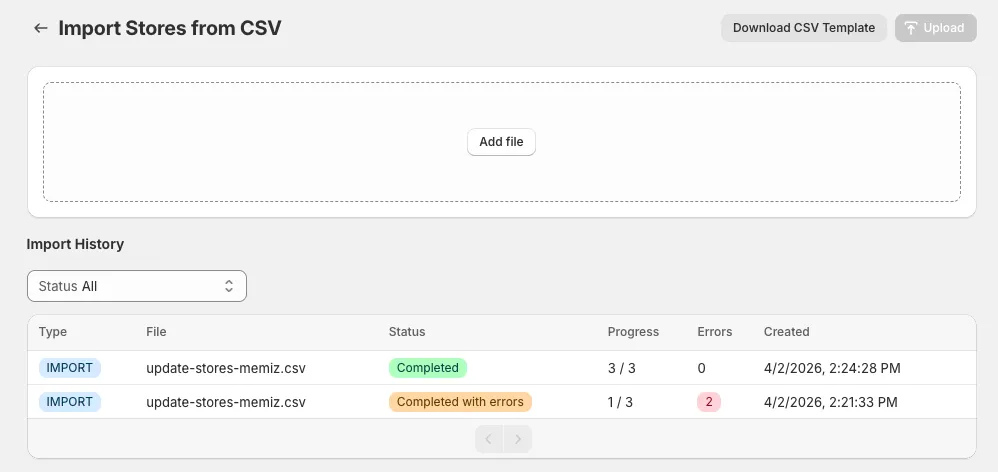
The Import History table shows every import with its progress and status. An import marked Completed with errors has rows that could not be imported; the Errors column shows how many. Fix those rows in your file and import it again.
Import or match stores from Shopify and Google
If your locations already exist in Shopify or in your Google Business Profile, you can bring them in instead of typing them again.
The Shopify menu on the Stores page has two options:
- Sync with Shopify brings your Shopify locations into Shoppy Connect.
- Find Shopify Matches links stores you already have in Shoppy Connect to their matching Shopify locations.
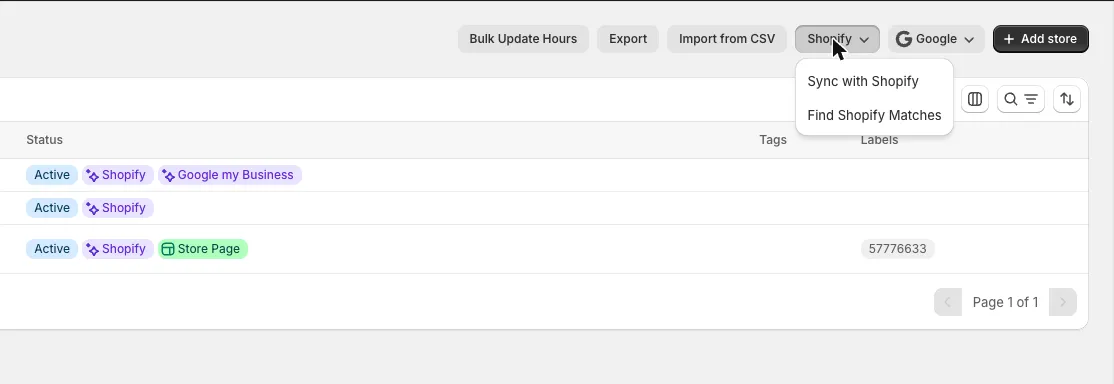
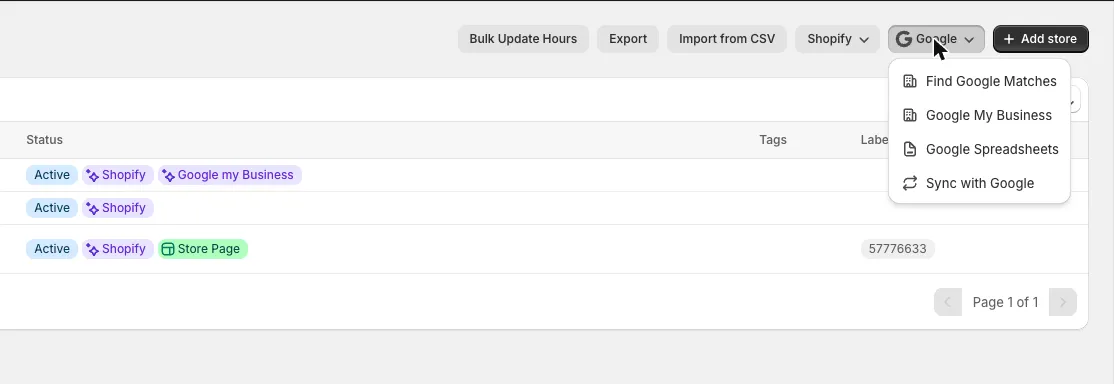
The Google menu works the same way for Google:
- Find Google Matches links your stores to their Google Business Profile listings.
- Google My Business imports locations from your Google Business Profile.
- Google Spreadsheets imports stores from a Google Sheet.
- Sync with Google updates your stores and Google with the latest details.
Export your stores
Click Export on the Stores page to download your store list, for example to review it in a spreadsheet or keep a backup.
What you can set on a store
Open a store from the Stores list to see and edit its details. Most of the work happens on the Details tab.
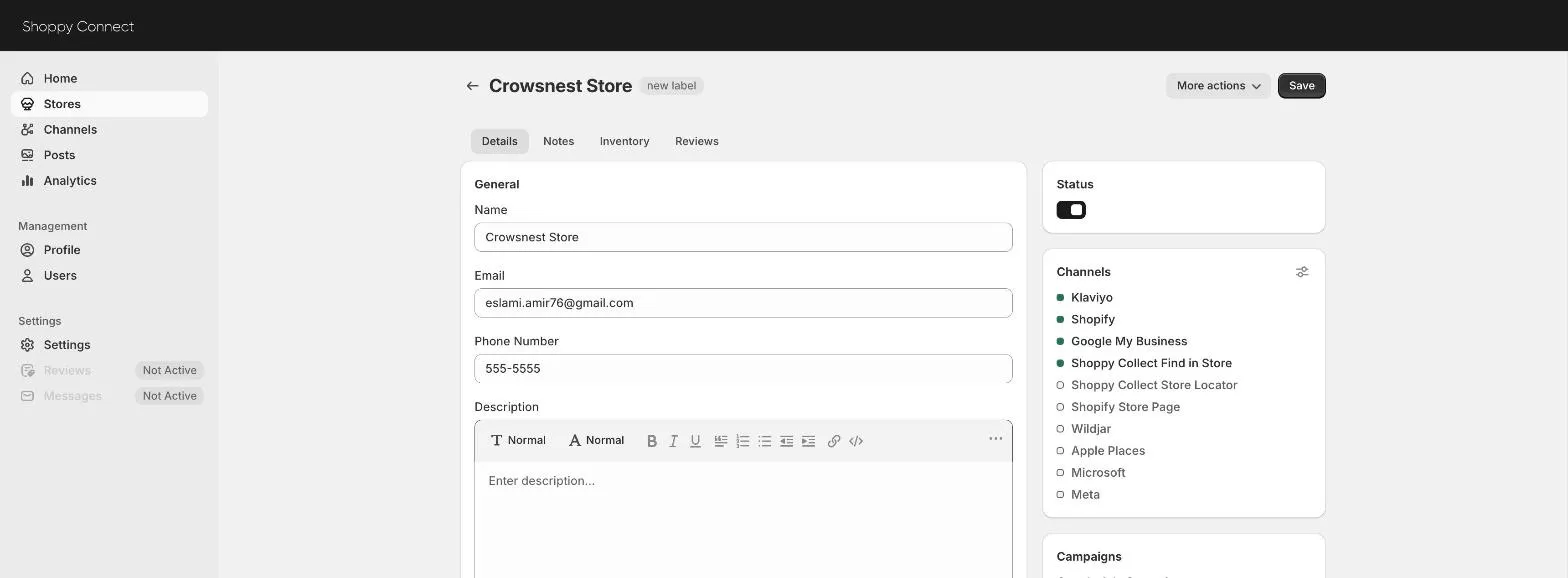
General
- Name, Email, and Phone Number: shown to customers on your channels.
- Description: the full description of the store. You can format it with headings, bold text, lists, and links.
- Short Description: a one or two sentence summary, used where space is limited.
Address
Start typing in Address Line 1 and pick the right address from the suggestions. Country, state, city, and postcode fill in for you. Use Address Line 2 for a suite or shop number, and click Show map to check the pin is in the right place.
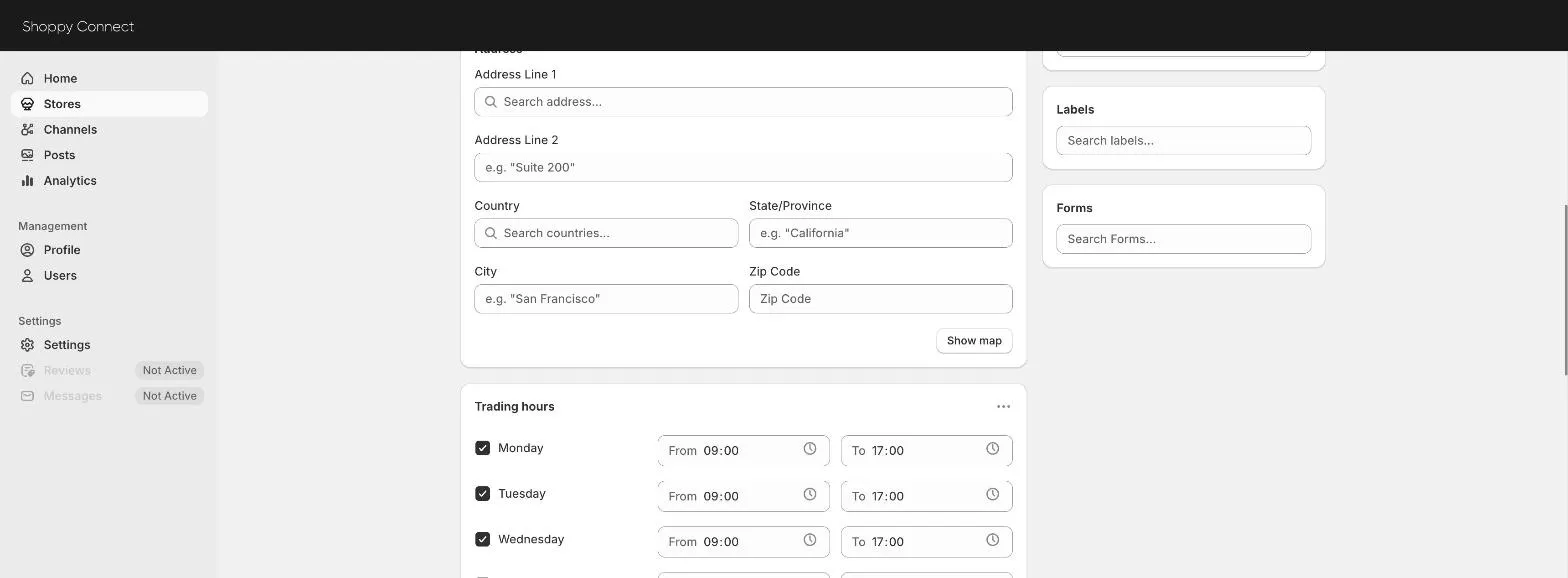
An accurate address matters: it is what customers see on Google Maps and in your store locator, and it is how they get directions to you.
Trading hours and special dates
See Trading hours and special dates below.
Media
Upload photos of the store, such as the shopfront or the inside. Photos must be .jpg, .webp, or .png files, up to 1 MB each.
Metafields
Extra fields your organisation has set up, such as a headline or key selling points. Fill them in to show that information on your store pages.
Search Engine Listing
How the store’s page appears in search results. See Search engine listing.
On the right of the page
- Status: switch a store off to stop showing it on your channels without deleting it.
- Channels: the channels the store is published to. Click the settings icon on the card to choose which channels show this store.
- Campaigns: link the store to its Google Ads and Microsoft Ads campaigns.
- Smart Store Dashboard: switch on to create a performance dashboard for this store, then click Open Dashboard to view it.
- Store Page: see Shopify store pages.
- Tags, Labels, and Forms: organise the store and choose which forms (such as Contact Store) appear on its page.
When you have made your changes, click Save at the top or bottom of the page. Click Discard to undo changes you have not saved yet.
Choose where a store is published
On the Channels card of a store, click the settings icon to open Manage publishing. Switch each option on or off for this store, then click Done.
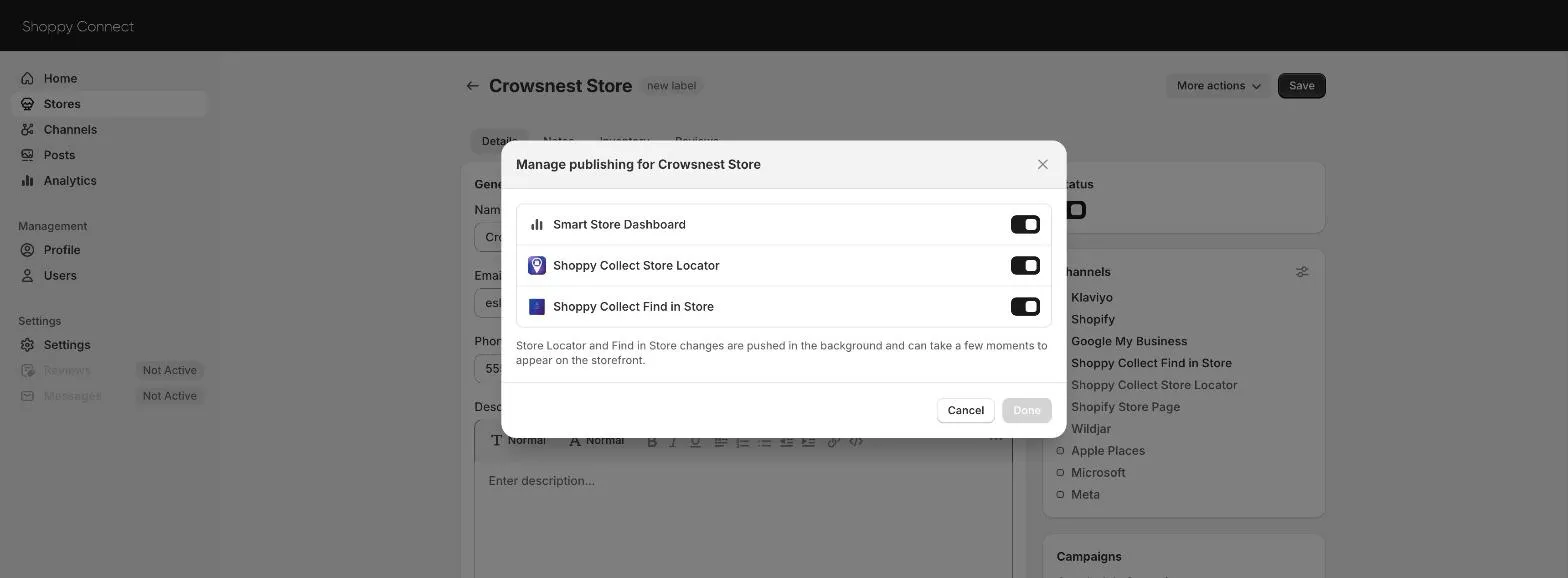
Changes to the store locator and Find in Store are sent in the background and can take a few moments to appear on your website.
More actions
The More actions menu at the top of a store has shortcuts for that store:
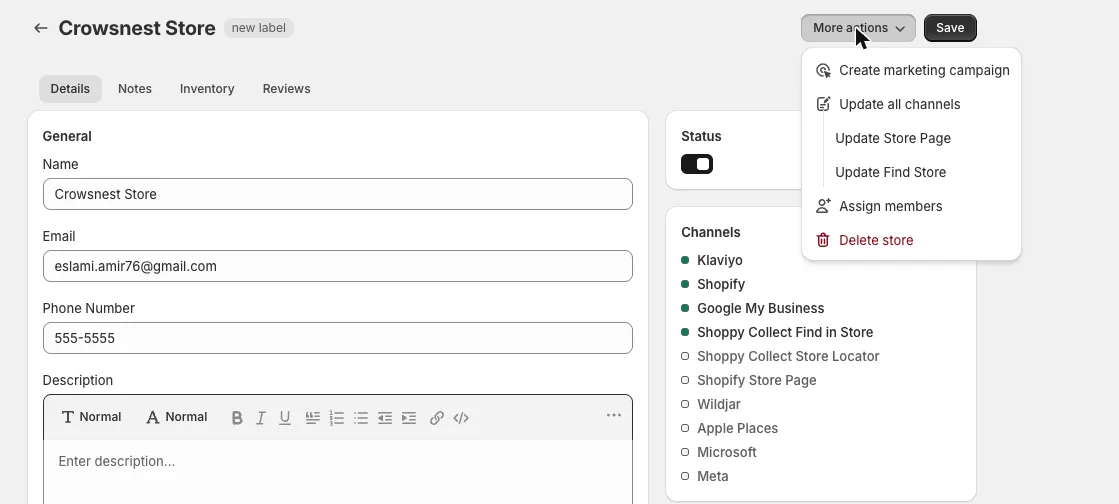
- Create marketing campaign: start a campaign for this store.
- Update all channels: send the store’s latest details to every channel it is published to. Use Update Store Page or Update Find Store to update just one of them.
- Assign members: choose which team members look after this store.
- Delete store: permanently remove the store. If you only want to hide it for a while, switch off its Status instead.
Other tabs on a store
- Notes: leave notes for your team, or turn a note into a task.
- Inventory: see how much of each product this store has available and on hand.
- Reviews: see the Google reviews for this store.
Trading hours and special dates
Customers check your hours before they visit, so keeping them right is one of the most important things you can do. Shoppy Connect keeps two kinds of hours for every store:
- Trading hours: your regular weekly opening hours.
- Special dates: one-off changes, such as public holidays, stocktake days, or extended hours over Christmas.
Set a store’s trading hours
- Open the store from the Stores list.
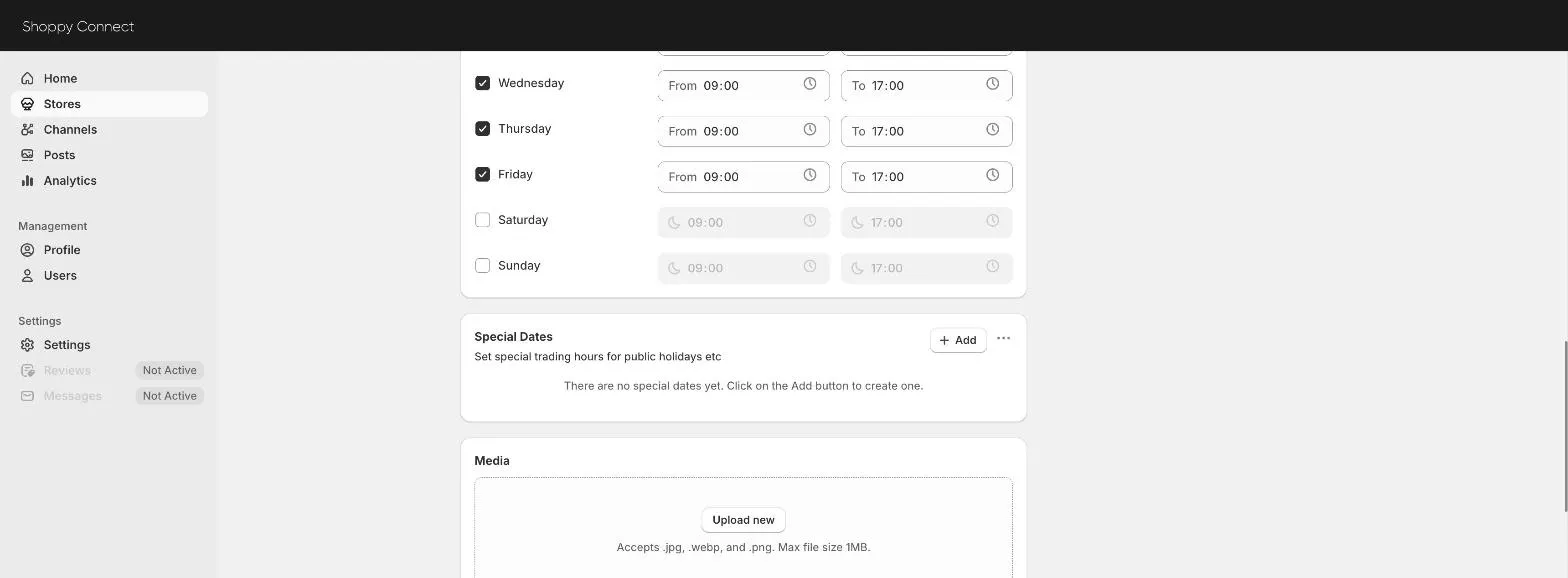
- Scroll to the Trading hours card on the Details tab.
- Tick each day the store is open and set its From and To times.
- Leave a day unticked if the store is closed that day.
- Click Save.
Add a special date
Use special dates for days when your hours are different from usual.
- On the store’s Details tab, find the Special Dates card and click Add.
- Enter a Title, for example “Christmas Day” or “Boxing Day”.
- Pick the Date. You can pick a single day or a range of days.
- Either switch on Closed, or set the opening and closing times for those days.
- Click Save.
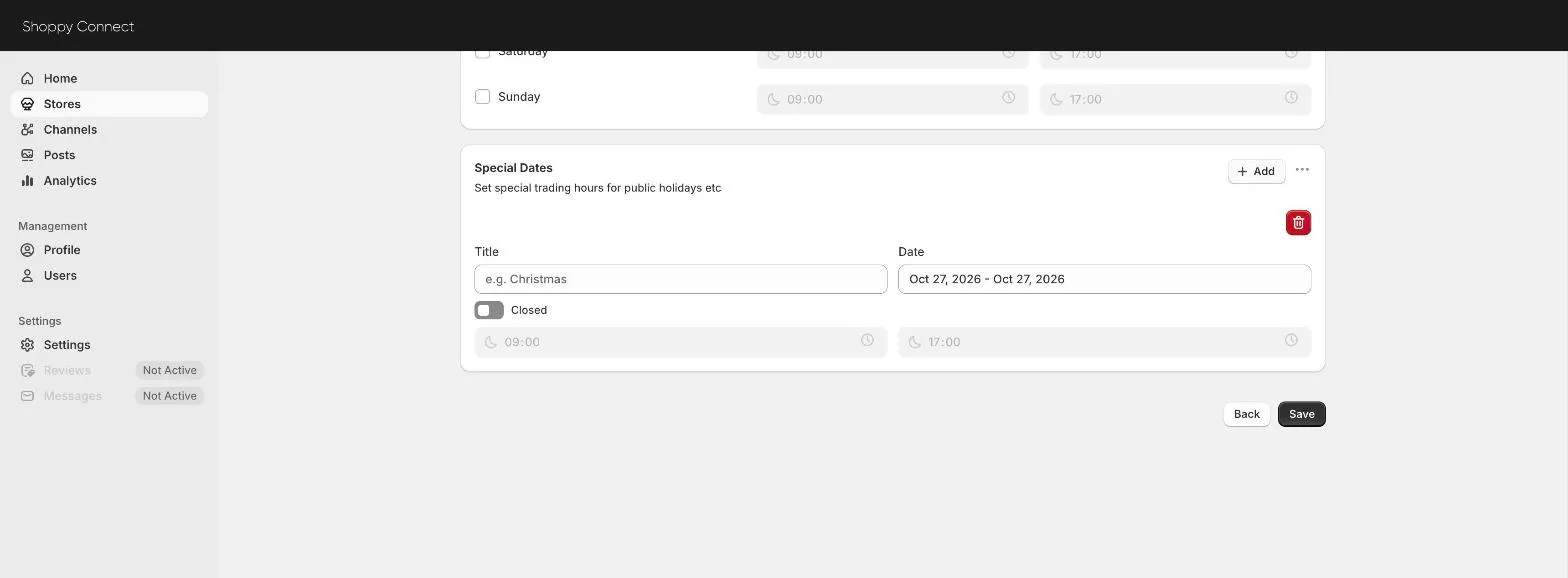
To remove a special date, click the red bin icon next to it, then click Save.
Add special dates well ahead of time, so customers see the right hours when they plan their visit.
Update hours for many stores at once
When the same hours apply to several stores, such as a public holiday across a region, use Bulk Update Hours instead of editing each store.
-
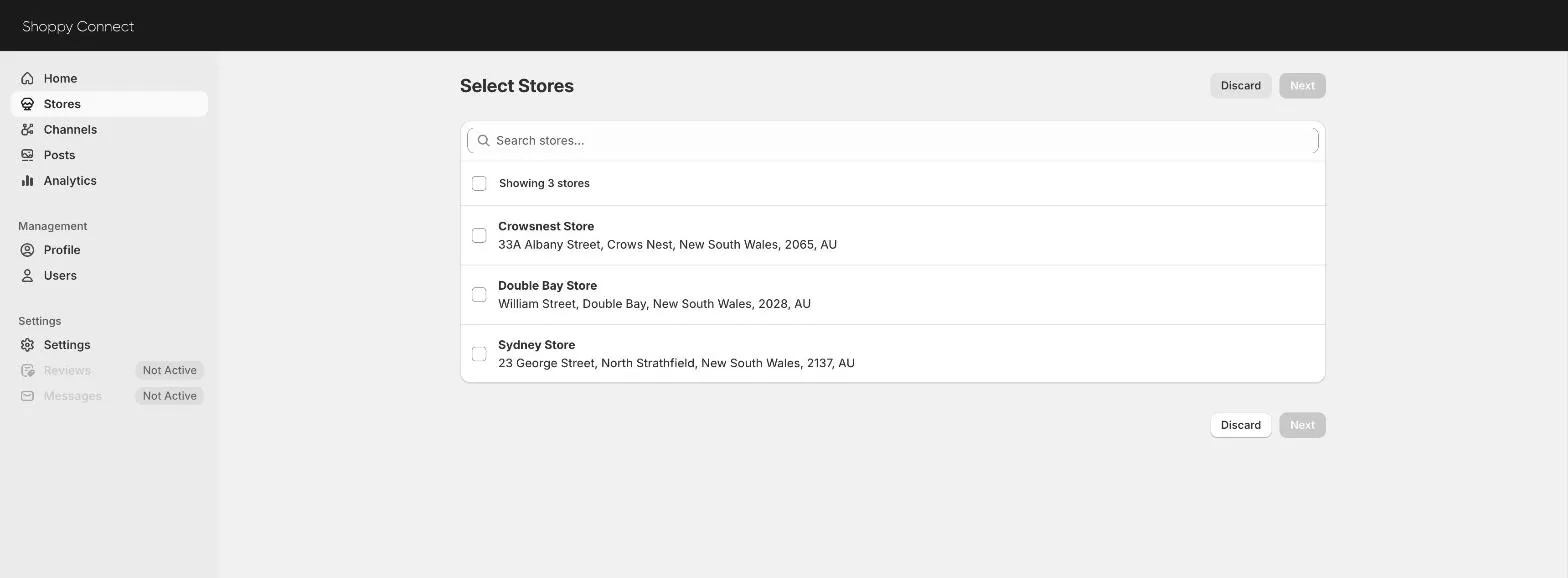
On the Stores page, click Bulk Update Hours. You can also click + in the top bar and choose Bulk Update Hours.
-
Tick the stores you want to update, or use the search box to find them, then click Next.
-
Set the trading hours and add any special dates, the same way as for a single store.
-
Click Save.
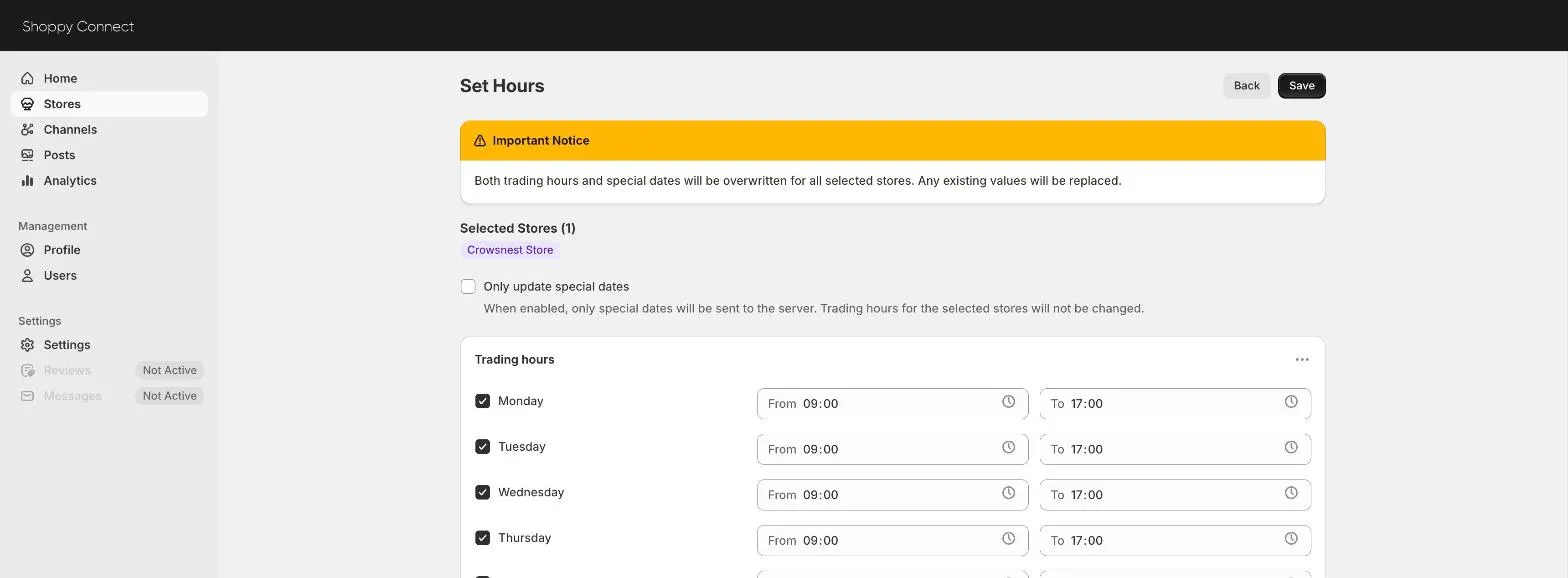
Important: Bulk Update Hours replaces both the trading hours and the special dates of every selected store. Any hours already set on those stores are overwritten.
If you only want to add holiday hours and keep each store’s regular hours as they are, tick Only update special dates before you save. Shoppy Connect then changes only the special dates.
Shopify store pages
Shoppy Connect can create and manage a page on your Shopify site for each store, for example yourshop.com/pages/crowsnest-store. The page shows the store’s details, hours, photos, and the forms you’ve chosen, all managed from Shoppy Connect. You don’t need to build or edit the page in Shopify.
Turn on the Shopify Store Page channel
Store pages are a channel, so they need to be connected once for your organisation.
- Go to Channels in the sidebar.
- Find Shopify Store Page and click Connect.
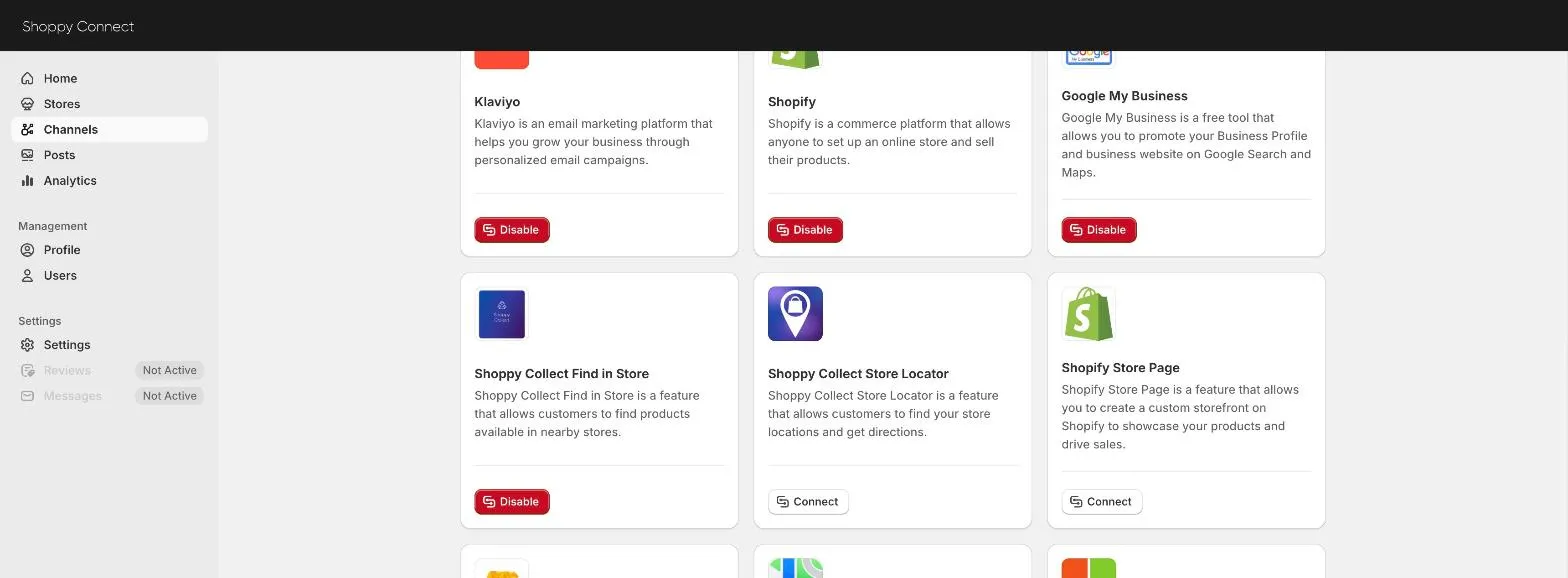
The Shopify channel must also be connected, because the pages are published to your Shopify store.
Publish a page for a store
- Open the store from the Stores list.
- On the right of the Details tab, find the Store Page card.
- Switch Publishing on.
- Click Save.
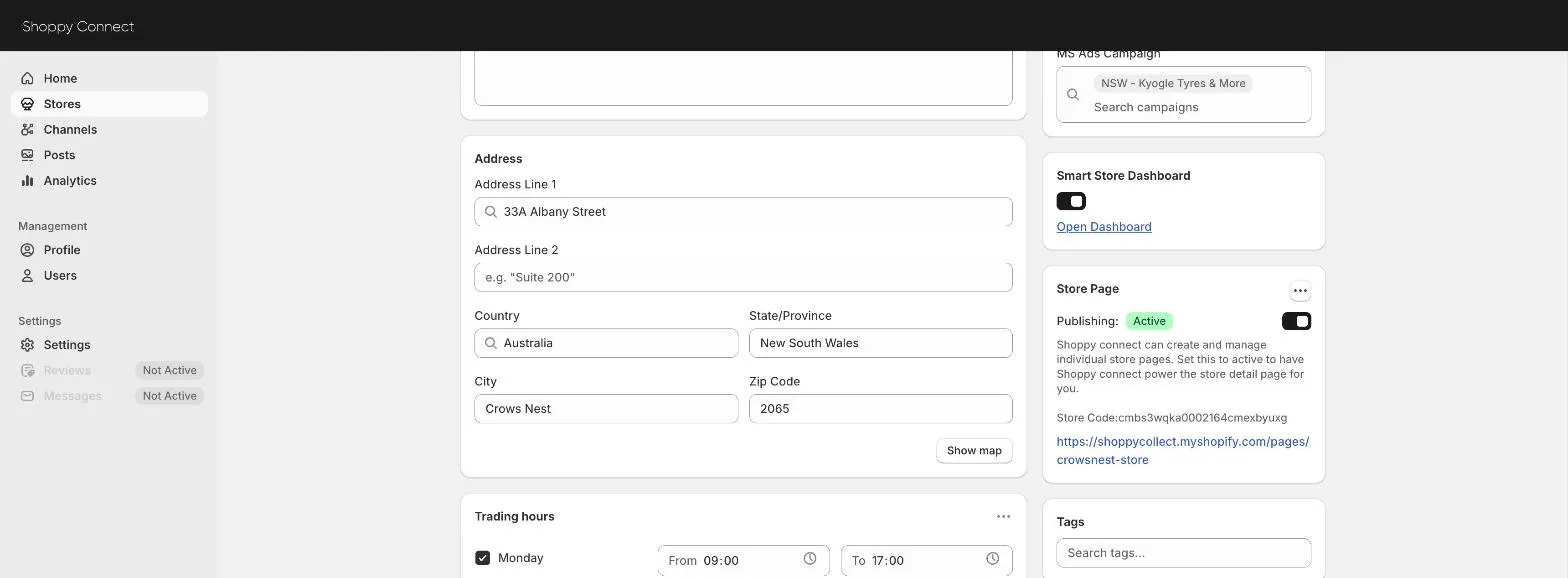
When the page is live, the card shows Active, the store’s Store Code, and a link to the page on your Shopify site. Click the link to check how the page looks. The Stores list also shows a Store Page badge for stores with a published page.
To take a page down, switch Publishing off and save.
Search engine listing
The Search Engine Listing card controls how the store page looks in Google and other search engines. It shows a preview of the title and web address.
Click the pencil icon to edit:
- URL handle: the last part of the page address, for example
crowsnest-store. Use lowercase words separated by hyphens. - Meta description: the summary shown under the title in search results, up to 320 characters. Leave it empty to use the store description.
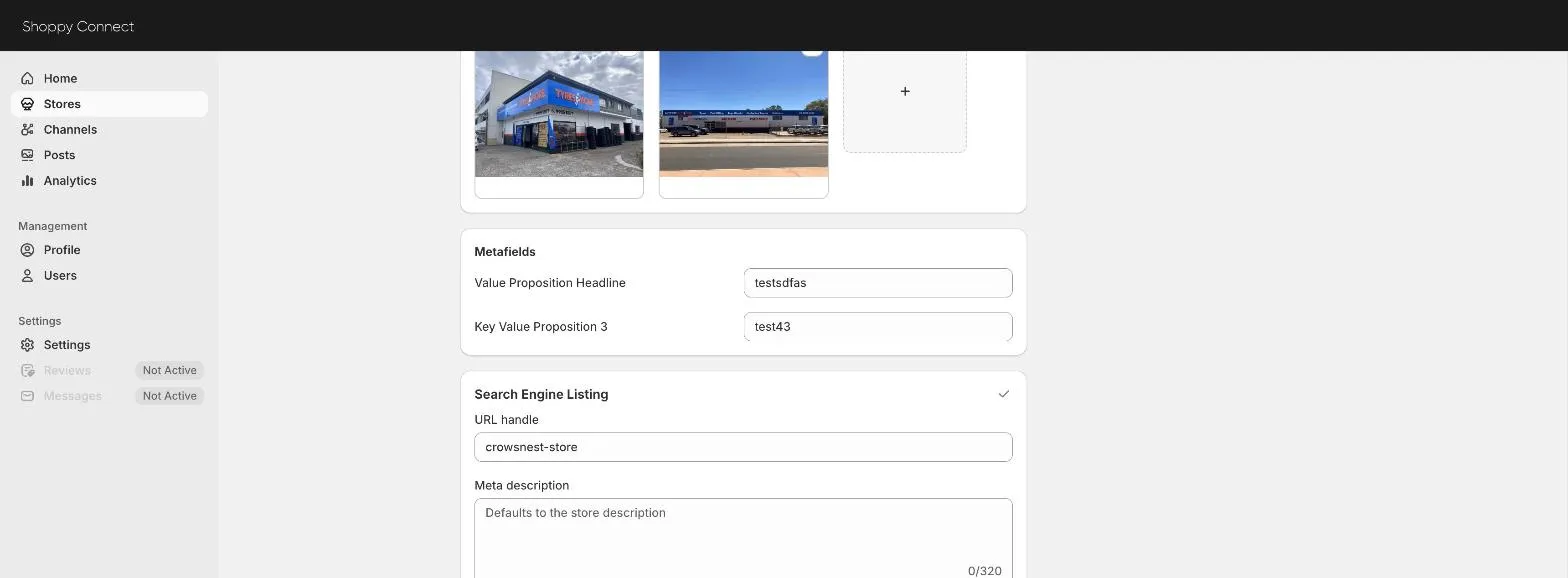
Changing the URL handle of a page that is already live changes its address, so links people have saved to the old address may stop working.
Keep the page up to date
After you change a store’s details, hours, or photos, send the changes to its page: open the store, click More actions, and choose Update Store Page, or Update all channels to update every channel at once.
Page template
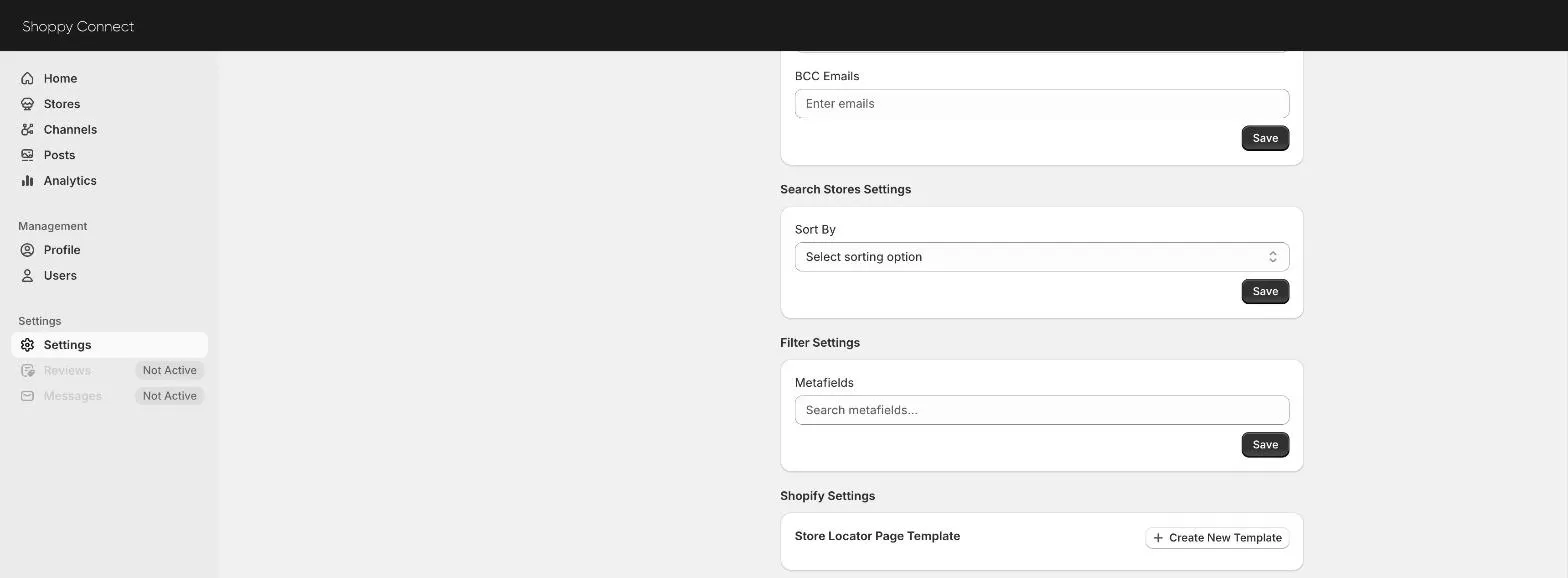
The layout used for your store pages is set once for your organisation, under Settings › General › Shopify Settings › Store Locator Page Template.
Tips
- Set up your hours and address carefully on one store first, check how it looks on its store page and on Google, then add the rest.
- Use special dates for every public holiday, even when you’re open as usual, so customers aren’t left guessing.
- Before a holiday period, use Bulk Update Hours with Only update special dates ticked to add the same holiday hours to all your stores in one go.
- Switch off a store’s Status while it’s closed for renovation, instead of deleting it.